Wednesday, July 21, 2010

And The Baker Said "Let There be Cheesecake!"


Cheesecake...dulce de leche...do you need to read the rest of this post to be convinced that you must make these? Let us consider the pros and cons. The pros: a rich texture of cream cheese with a buttery graham cracker crust, the sinful addition of dulce de leche, and a glossy layer of chocolate to top it all off. The cons: that these are just photos and you are not eating a piece this very second. I baked these squares for my coworkers at From the Top, and an clean pan was returned to me within hours of its arrival at the office. In other words, I highly recommend this recipe for all lovers of cheesecake, and possibly to those who have an aversion towards this classic dessert as well. It's just that good.
There is nothing more beautiful than dulce de leche. A simple ingredient, it has the capacity to transform any dessert from average to extraordinary. I always make my own based on David Lebovitz's recipe, and it turns out perfect every time (see above). The traditional method of preparation is boiling a can of sweetened condensed milk over the stovetop. This method seems particularly dangerous when one considers it could become a volatile procedure. The oven method is my preference, and has always produced the desired. That bowl of dulce de leche was extremely difficult to set aside to complete the recipe.
It is regrettable that cheesecake has not received due recognition on this blog considering it is a specialty of mine. But I do have one very special recipe in mind that will soon grace the archives of this site (it's a surprise, so stay tuned!). As far as this recipe is concerned, it takes a slightly different route than your traditional cheesecake: it calls for unflavored gelatin. Being the purist I am, this ingredient was one I initially opposed. Yet one of the setbacks in making cheesecake squares is their lack of stability. The addition of gelatin is a quick fix for said problem, and certainly proved its point with these squares.
Dulce de Leche Cheesecake Squares
Adapted from SmittenKitchen
Make 24-30 squares

Ingredients
Crust
  • 1 cup crumbled graham crackers (4 to 4 1/2 crackers)
  • 2 tbsp sugar
  • 3 tbsp unsalted butter, melted
Filling
  • 1 tsp unflavored gelatin (from a 1/4-oz envelope, will be just about half an envelope)
  • 1/4 cup whole milk
  • 8 oz cream cheese, softened
  • 2 large eggs
  • 3/8 teaspoon salt
  • 1 cup dulce de leche (store-bought, or homemade)
Glaze
  • 3 oz bittersweet chocolate (not unsweetened), coarsely chopped (I used Ghiradelli)
  • 1/2 stick (1/4 cup) unsalted butter, cut into pieces
  • 2 teaspoons light corn syrup

Directions

For Crust: Put oven rack in middle position and preheat oven to 325°F. Line bottom and sides of an 8-inch square baking pan with 2 sheets of foil (crisscrossed), leaving a 2-inch overhang on all sides.

Finely grind crackers with sugar and a pinch of salt in a food processor*. With motor running, add butter, blending until combined. Press mixture evenly onto bottom of baking pan. Bake 10 minutes, then cool in pan on a rack 5 minutes.

*If you don't have a food processor (like me), then grinds the crackers, sugar, and salt in a blender. Once done, place in a bowl and mix in the melted butter (much less of a mess this way)

For Cake: Sprinkle gelatin over milk in a small bowl and let stand 2 minutes to soften. Beat together cream cheese, eggs, salt, and gelatin mixture in a bowl with an electric mixer at medium speed until well combined, about 2 minutes, then stir in dulce de leche gently but thoroughly. Pour filling over crust, smoothing top, then bake in a hot water bath (I was able to fit mine in a 9×13-inch baking pan) in oven until center is just set (shake the pan gently to test for this), about 45 minutes.

Once done, turn off the oven and leave the cheesecake inside for at least 1 hour (this will prevent the unseemly crack notorious to all cheesecakes), then remove from oven and let cool on a rack for an additional 45 minutes to an hour. Chill, covered, at least 6 hours.

For Glaze: (within 2 hours of serving) Heat all glaze ingredients in a double boiler or a small metal bowl set over a saucepan of barely simmering water, stirring until smooth, then pour over cheesecake, tilting baking pan to coat top evenly. Chill, uncovered, 30 minutes.

Lift cheesecake from pan using foil overhang and cut into 1-inch squares with a thin knife, wiping off knife after each cut. (This is crucial! I had a glass of water next to me while cutting the squares, and I dipped the knife after each slice)

Note: Cheesecake (without glaze) can be chilled up to 3 days. If glaze is chilled overnight, it will make it difficult to cut

Monday, July 12, 2010

In Honor of Germany's Performance at the 2010 FIFA World Cup


Okay, so German Chocolate Cake is by no means of German origin, but instead owes its name to Baker's German's Sweet Chocolate; a dark baking chocolate bar created by Englishman Samuel German. But I felt Germany deserved to be acknowledged for an extremely valiant effort in the 2010 FIFA Tournament, and this decadent dessert seems to do them justice regardless of origin. I had also promised my coworkers at From the Top that I would provide them with baked goods after having circulated this blog link around the office. So the choice: German Chocolate Cupcakes.

Let me preface this blog entry by saying the following: these cupcakes are not your standard "Betty Crocker" cupcakes that mushroom 6 inches above the pan. In fact, the tops are almost completely flat. But looks can be deceiving, and this cupcake has a few tricks up its sleeve. The first secret? Separating the eggs. Emulsifying the yolks into the batter then folding in the (whipped) egg whites separately create a texture that is both light and rich! The yolks provide the leavening agent, while the whites incorporate just enough air into the mix to create a fluffy consistency. The second secret: buttermilk! Now I have mentioned this in previous posts - I never purchase buttermilk for baking (unless it is an essential component to the overall taste, in which case I shell out the extra dime). But the simplicity of adding a tablespoon of white vinegar to a cup of milk will produce the desired effect, and it is an effect that is by and far a leading contributor to the beautifully moist texture of these cupcakes.
Now on to the recipe: these cupcakes are from one of my favorite blogs - David Lebovitz. As a resident of Paris, he has learned that the French palate prefers desserts that are not as sugar-laden as American recipes. I personally find it a welcome change of pace considering it presents a dessert that relies more on the quality of its ingredients than on that extra cup or two of sugar.it calls for cake flour, but having never had the energy/funds to stock up on said ingredient, I always resort to all-purpose. The trick? Loosely-measuring all-purpose flour will produce the same effect as cake flour (as illustrated above). The buttermilk and cake flour shortcuts are two constants in my baking, and saviors to my wallet.
Another change: I used a mixture of unsweetened coconut with sweetened. This combintation produced a well-balanced frosting that wasn't too overwhelming or lacking in sweetness. I also doubled this recipe wanting to create 24 cupcakes...I ended up with 32. Not sure how that happened, but just be aware that this is a possibility. WARNING: upon finishing all the steps required for the batter, you will be tempted to take a spoon and eat it straight from the mixing bowl (see above). RESIST this temptation by all means and proceed to fill those cupcake liners. Trust me, the baked product is way worth it. But definitely feel free to have a spoonful (or five) of the frosting ;)
German Chocolate Cupcakes
Adapted (and Doubled) from David Lebovitz
24-28 cupcakes


Cupcakes

  • 4 ounces bittersweet or semisweet chocolate, chopped
  • 1/2 cup boiling water or coffee
  • 16 tbsp (2 sticks) unsalted butter, at room temperature
  • 1 1/2 cups sugar
  • 4 large eggs, at room temperature, separated
  • 1 tsp vanilla extract
  • 2 cups loosely-measure all-purpose flour
  • 2 tbsp unsweetened natural cocoa powder
  • 1 teaspoon baking soda
  • 1 teaspoon salt
  • 1 cup (125 ml) buttermilk (or 1 cup milk + 1 tbsp white vinegar/lemon juice)
Frosting

  • 1 1/2 cups evaporated milk
  • 1/2 cup packed light brown sugar
  • 4 large egg yolks
  • pinch of salt
  • 4 tablespoons butter, salted or unsalted, at room temperature
  • 4 ounces bittersweet or semisweet chocolate, chopped
  • 3 cups sweetened or unsweetened coconut flakes, lightly toasted (or 1 1/2 cups of each)
  • 2 cups chopped, toasted pecans
  • 1 teaspoon vanilla extract
Directions

For Cupcakes: Preheat the open to 350ºF (180ºC). Line a muffin tin with 12 cupcake liners. Pour the boiling water or coffee over the chocolate, and stir until melted. Set aside. In the bowl of a stand mixer, or by hand, beat the butter and sugar until light and fluffy. Add the egg yolks and mix until thoroughly incorporated. Then mix in the vanilla and the melted chocolate. Whisk together the cake flour, cocoa powder, baking soda, and salt. Alternate adding the flour mixture and the buttermilk, beginning and ending with the flour.

In a clean, dry bowl, whip the two egg whites until stiff, then fold one-third of them in to the chocolate batter, then the rest. Fold just into there are no streaks of white remaining, but don't overfold. Divide the batter between the muffin cups and bake for about 25 minutes, until the batter feels just set in the center. Remove from the oven, then let cool for a few minutes.
Once cool enough to handle, remove the cupcakes from the muffin tin and let cool on a wire rack completely before frosting


For Frosting: Whisk together the evaporated milk, brown sugar, egg yolks, and salt in a medium saucepan. Add the butter, then cook the mixture, stirring constantly with a heatproof spatula over medium heat, like a custard, until the mixture begins to thicken and coats the spatula. Do not let boil.

Remove from heat and immediately whisk in the chocolate, stirring gently until melted. Then stir in the coconut, pecans, and vanilla. (If using just unsweetened coconut, you can add an additional teaspoon of brown sugar if it's not sweet enough, to your taste.) Let cool to room temperature, then use the frosting to ice the cupcakes, topping the cupcakes with a bit of toasted coconut as a garnish after you ice them, if you wish.

Saturday, July 10, 2010

"Carrots are divine... You get a dozen for a dime, It's maaaa-gic!"

We all know Bugs Bunny can't resist the temptation of a carrot (as shown in the title of this post). And the ever-expanding healthy movement has embraced it's nutritional values as the perfect snacking commodity (especially with hummus, a personal favorite!). But who ever got the idea to put carrots into a dessert?

According to Wikipedia, using carrots as a sweetening agent has been in effect since medieval times, given it was more affordable and readily available than conventional sweeteners. The carrot was a good substitute because, like the sugar beet, it has a higher sugar content than other vegetables. Sweet and cheap? Bugs Bunny couldn't have put it better...
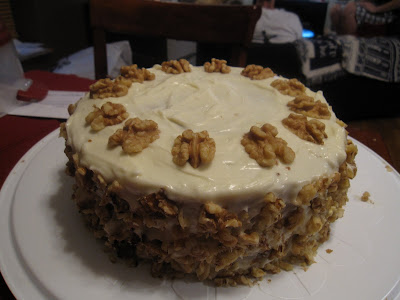
Now that I've ranted about carrots, I should confess that this cake by no means solely depends on the sugar content of the carrot. It packs a LOT of flavor, and is a bit more of an intense carrot cake than the one grandma used to make. Nonetheless, I can guarantee you won't be disappointed.

Now let's talk about this cake - the recipe comes from one of my favorite blogs, SimplyRecipes, and is apparently a family heirloom. I made this for a trumpet friend of mine, Tom Daniels - granted, his birthday had been several weeks prior, but I keep my word. Obviously we have carrots, but there are two power ingredients in this recipe that caught my attention. The secret to a great carrot cake is getting the perfect moist texture. Most recipes use oil (from safflower to olive, the latter being what I used), but some call for either crushed pineapple or applesauce as well. This one uses crushed pineapple, a flavor I feel pairs better with carrot in this instance. But it was the addition of shredded COCONUT that made me realize this was an offer I couldn't refuse.
I warned you this was an intense carrot cake. But I've always had the "sky's the limit" approach when trying new baking recipes, so this was right up my alley. That being said, there are plenty of other recipes out there worth trying. One recipe I can personally recommend is from the Joy of Baking. I just couldn't resist that coconut...
Okay, so I slipped up on this recipe - I completely forgot to add the walnuts to the batter. To my credit, it was 95 DEGREES outside, and thinking becomes a little cloudy when you are standing in a kitchen, while preheating an oven, and the weather feels as though it could bake a cake itself (also my excuse for not having as many photos during the process). My solution? Add the nuts (even more finely chopped than what the recipe calls for) to the cream cheese icing! So it sort of defeat the purpose, but that killer set of ingredients did their job without fail and it still turned out to be an AMAZING cake!
Notes: I used unsweetened coconut and added about 1 tsp of confectioner's sugar and a few drop of water. The recipe says it will take about 45 - 50 minutes, whereas mine took about 40 - 42. Make sure to check after 35 just to be safe. Also (as reflected in the directions) I mixed the ingredients a little differently than called for to a) allow better incorporation and b) prevent the works from flying all over my kitchen.

Carrot Cake Recipe
Adapted from SimplyRecipes
Serves 12-16

Ingredients
Cake

  • 3 cups unbleached all-purpose flour
  • 2 cups sugar
  • 1 teaspoon salt
  • 1 Tbsp baking soda
  • 1 Tbsp cinnamon
  • 1 1/2 cups olive oil or grapeseed oil
  • 4 large eggs, lightly beaten
  • 1 Tbsp vanilla extract
  • 1 1/2 cups shelled walnuts, chopped (what I left out, oops! Reserve extra for garnish)
  • 1 1/2 cups sweetened, shredded coconut (I used unsweetened + 1 tsp powdered sugar)
  • 2 cups of finely grated carrots
  • 1 cup of drained crushed pineapple
Frosting
  • 8 oz cream cheese, at room temperature
  • 6 Tbsp unsalted butter, room temp
  • 2 1/2 cups of confectioners' sugar
  • 1 teaspoon vanilla extract
  • 2 Tbsp lemon juice
  • (technically this is where the walnuts fell in my own creation)


Directions

For Cake: Preheat oven to 350°F. Butter and flour two 9-inch cake pans. Sift dry ingredients into the bowl of a stand mixer (or a large mixing bowl if using a hand mixer). Combine oil, eggs, and vanilla in a separate bowl (I would suggest a wet measure cup or comparably sized pitcher to allow easy pouring). Slowly incorporate the wet ingredients into the dry, beating on a low speed after every addition. Once all the oil mixture has been incorporated, make sure to beat well. Fold in chopped walnuts, coconut, carrots and pineapple (or in my case, forget about the walnuts, haha!)
Pour batter into pans. Set on the middle rack of oven and bake for 45-50 minutes (shift positions of cakes front-to-back if necessary about halfway through), until edges have pulled away from sides and a toothpick or sharp knife tip inserted into the center of the cake comes out clean. Cool on a cake rack.
For Icing: Cream together the cream cheese and butter in a mixing bowl. Slowly sift in the confectioners sugar and beat until mixture is free of lumps. Stir in vanilla and lemon juice.
For Assembly: Once cakes have cooled, place one layer, flat side down, on a cake plate/caddy/presentation platter of choosing and spread about 1/2-cup of frosting over top. Top with second layer and frost the remainder of the cake. Sprinkle top with chopped walnuts or arrange walnut halves in a crown around the top (Note: if you forgot the nuts, like me, then feel free to add them in between the layers as well as around the cake).
Win

Sunday, June 20, 2010

When Chocolate met Raspberry - A Match made in Heaven


There are always those standard flavors that pair together as though they were a meant to be - strawberry and banana, butter and pecan, peanut butter and jelly, etc. But when you pair raspberry and chocolate, it takes true love to a whole new level. Naturally, most fruits pair quite while with chocolate. Most of us have had chocolate-covered strawberries (to DIE for!) or dipped slices of banana in melted chocolate fondue. But raspberries "take the cake" on being paired with chocolate, and this cake definitely proved that.
Confession: I found a recipe and did not agree with it. It called for not 1, not 2, but THREE cups of sugar. Mind you, this was for two 9-inch cakes...that's a LOT of sugar, at least based on my experience. As such, I cut out an entire cup. I also used instant coffee (even though the recipe calls for "freshly brewed"). Honestly? When drinking coffee, you know when you've got the real deal versus the "short-cut". When baking with coffee, who cares? It's the flavor that counts, and coffee flavor within a recipe context doesn't necessarily need from the finest Costa Rican roast available on the market! In other words, NesCafe is just as good as any ground/full bean coffee you could use when baking. The addition of coffee makes the batter quite thin, so don't get nervous when you end up with batter the consistency of chocolate milk.
This recipe is from Taste of Home, but as aforementioned I chose to deviate from the original quite a bit. The frosting seemed too sweet and the filling seemed to dense. So I chose the following combination: a Taste of Home cake recipe, a Raspberry Whipped Cream Filling recipe, and a simple Chocolate Ganache recipe to top it all off. I hope you enjoy this recipe - my only word of caution: careful not to be carrying/wearing anything of great import. The danger of having chocolate ganache rub off on you sleeve/bag is huge! (but melted chocolate is still a beautiful thing)
You will notice in the post at the end of this article that there appear to be "three" layers of cake, rather than the two this recipe creates. That results from my having a cake pan that is a 9-in pan and one that is a 9 3/4-in pan. The latter, even though it's only 3/4 of an inch larger than the former, creates cake that are nearly twice the size of the other one! For this recipe, I simply added a little more to that pan, baked it longer, then cut it in half to create a third layer. Regardless, I plan to buy a pan that actually matches either of the ones I currently have so as to not have to end up with disproportionate cake layers.
Chocolate Cake with Raspberry Cream Filling and Chocolate Ganache
adapated via Taste of Home
Serves 10-12

Ingredients

Chocolate Cake
  • 2 cups sugar
  • 2 3/4 cups all-purpose flour
  • 1 cup baking cocoa
  • 2 teaspoons baking soda
  • 1 1/2 teaspoons salt
  • 3/4 teaspoon baking powder
  • 1 1/4 cups buttermilk
  • 3/4 cup canola oil
  • 3 teaspoons vanilla extract
  • 3 eggs
  • 1 1/2 cups strong brewed coffee, room temperature
Raspberry Cream Filling
  • 1 cup heavy cream
  • 1- 2 tbsp sugar
  • 1/2 tsp vanilla extract
  • 1/2 cup raspberry preserves
Chocolate Ganache
  • 1 cup heavy cream
  • 1/2 tsp vanilla extract
  • 1 1/2 cups semisweet chocolate chips
Directions

For Cake: Line three greased 9-in. round baking pans with waxed paper and grease paper; set aside. In a large bowl, combine the first six ingredients. Combine the buttermilk, oil and vanilla; add to the dry ingredients. Add eggs, one at a time, beating well after each addition; beat for 2 minutes. Gradually add coffee (batter will be thin).

Pour batter into prepared pans. Bake at 350° for 35-40 minutes or until a toothpick inserted near the center comes out clean. Cool for 10 minutes before removing from pans to wire racks to cool completely; discard waxed paper.

For Raspberry Cream Filling: Whisk cream in a bowl until soft peaks begin to form, gradually adding in the vanilla and sugar. Gently fold in the preserves.

For Chocolate Ganache: Place semisweet chocolate chips in a glass bowl and set aside. Heat heavy cream and vanilla in a small saucepan over medium heat. Just as it begins to boil, remove from heat and pour over chocolate chips; let sit for 5 minutes. Then, gradually whisk starting from the center until all the chocolate is melted and incorporated. Chill for 5 minutes, so that it thickens but is still pourable.

For Assembly: If the cakes have domed too much during the baking process, level them a bit using a long knife. Place one layer, flat side down, on a cake plate. Spread cream filling to within a 1/2-inch margin of the layer, then place the second layer on top. Pour the ganache over the cakes and, using an offeset spatula, spread the ganache that pools at the bottom back up the sides of the cakes.

Wednesday, June 16, 2010

"The Cake Before Time" - Cake Decorating taken to a WHOLE New Level


When my friend Diana, a trumpet player at NEC, sent me an email with several cake concepts for her birthday cake, there was only one that we both knew was the trump card. Granted, I almost never take requests when it comes to recipes, but this challenge was just too good to be true. So when I decided to make a Dinosaur Cake (no novelty cake pans used here!) Frosting + Cut cake pieces = crumbly disaster!!! Okay, so it wasn't necessarily the end of the world, but having been my first attempt at frosting a uniquely shaped cake, it proved rather frustrating.
My first piece of advice: do NOT frost this cake all at once. That delicious buttercream frosting was not made to last for generations, and it will start to melt considering this is no ordinary frosting job. I occasionally took breaks and would place the tub of frosting into the freezer for a few minutes. This allowed the buttercream to stiffen enough that I wouldn't have to worry about it running down the sides of the cake (or in this case, down the tail of the dinosaur, haha!) My second piece of advice: make the cakes the night before. Letting them chill in the refrigerator overnight will make your life sooo much easier when approaching this recipe. I made the buttercream frosting the day of and let it sit in the fridge for 3o minutes prior to decorating. Slow and steady wins the race, as they say, and this is more than true when applied to decorating this cake.
That being said, a lot of people, when I create cakes like this, ask what I place more importance upon: the overall appearance or the taste of the actual cake? Now I affiliate the latter part of that question with the show Ace of Cakes. What has become the culinary equivalent of the Real World or American Chopper, this show follows a crew of pastry decorators who bake and create show-stopping cakes. Yet recent criticism has been drawn based on the fact that, while their cakes look stunning, they don't necessarily follow through on taste.

My opinion: NEVER sacrifice the taste of a cake for a recipe. I am all for making a cake with that "wow" factor but only if it follows through on taste. As such, I used my go-to chocolate cake recipe for this dinosaur: Hershey's "Perfectly Chocolate" Chocolate Cake. Those who had the chance to enjoy this cake LOVED it!!!

The spikes were little cocoa cookies I bought from whole foods, and I also added some sugar sprinkles as well (since, as aforementioned, this was a crumbly mess to start and a lot of the cake crumbs ended up in the frosting). Next time I make this, I might try a butter cake to lessen the crumb factor. But honestly I can't imagine recreating this design for anything other than a nephew's or friend's son's birthday party. Yet Diana, who LOVES dinosaurs, couldn't have been happier.

Sunday, June 13, 2010

Going Bananas for Banana Cream Pie (From Scratch!!!)


Okay, so while Banana Cream Pie is arguably an American Classic, this recipe was by no means "simple as pie". EVERYTHING was from scratch, and the smallest mishap with any component of this recipe could lead to disaster. Now naturally there's always the old-fashioned go-to for this recipe: a pre-bought pie crust from the frozen foods aisle with a prepared package of Jello Pudding to fill it. This recipe, though, refuses to except the old norm and took my pastry challenges to a different level.

I will admit - the frozen pie shell is truly a Godsend. It allows you to wait up until the last possible moment to prepare everything since it's all ready to go! But trust me, a homemade pie crust is by no means imitable, and once you finally learn how to do it you will find yourself avoiding the frozen pastry aisle at the grocery store quite readily. This particular pie crust required a blind baking period as the filling is not cooked within the shell. For this, you can use one of two things: actual pie weight or dried beans (as I did). Once done with the step, you can store the beans and make them your official "blind baking weights" since you won't want to cook with them after this process.
I can guarantee this is one of the flakiest, most flavorful pie crusts you will ever try! The photos do it little justice. The trick behind this amazing pastry is not overdoing it - cutting the butter the right number of times, folding the dough gently to incorporate the water, and rolling the dough just enough to form a ball will create a buttery, flaky crust you won't be able to resist!
Now here is an ingredient many don't see that often - the vanilla bean. Vanilla extract has made the versatile ingredient more accessible and affordable, but in its natural form vanilla becomes a true powerhouse of flavor. Not only do we get a greater depth to the essence of the bean, but it also adds a wonderful visual aesthetic. While extract can easily replace vanilla bean
Caramel is a beautiful addition to any dessert, but making it from scratch? I've made my own caramel in a previous post, and as before it's presence made the dessert. Always make sure to watch the sugar carefully - it can burn on the turn of a dime. Just as soon as the edges begin to get that deep amber color, remove it from the heat and let stir in the the heavy cream. This is the dangerous part as that cream will bubble up a LOT. Make sure to use a deep enough pan to prevent overflow.
The assembly of this cake is the best part. The pastry cream chilling in the fridge, the caramel cooling off to the side, and the pie crust is ready to be filled. Once the chocolate is melted, it and the caramel create the base of the filling, followed by the pastry cream, and finally the bananas. This recipe was created to fill a 10-inch crust, and since I used a 9-inch pie plate, I halved the dough recipe and had leftover caramel. The cream I simply filled to the top regardless (because it was just that good!) Trust me, I can guarantee your friends and guests will be craving seconds. Enjoy!
Banana Cream Pie with Homemade Caramel and Chocolate Crust
Adapted from ana_muh_rae
Serves 8 - 10

Ingredients:
  • (one) Fully Baked and Cooled 10-inch Flaky Tart Dough Pie Shell (below)
  • 3oz Bittersweet chocolate coarsely chopped (I used semisweet chocolate chips)
  • 1c. Heavy Cream (very cold)
  • 2tbsp. Sugar
  • 1/3c. Caramel (recipe below)
  • 2 1/2c. Pastry Cream (recipe below)
  • 2 Ripe Bananas, sliced into 1/4-inch-thick rounds
  • 3oz Bittersweet chocolate bar for making curl (I used Ghiradelli 60% Cocoa)
Flaky Tart Dough (makes enough for one 10-in crust or two 9-in crusts)
  • 1 tsp Salt
  • 2/3 cup Water, very cold
  • 3 cups + 2 tbsp all-purpose flour
  • 1 cup + 5 tbsp unsalted butter, very cold
Pastry Cream (2 1/2 cups)
  • 2 cups Whole Milk
  • 1/2 Vanilla bean
  • 1/4 tsp. Salt
  • 4 tbsp. Cornstarch
  • 1/2 cups + 1tbsp Sugar
  • 2 Large eggs
  • 4tbsp. Unsalted butter
Caramel (makes 1 1/2 cups)
  • 2/3c. Heavy cream
  • 1/4 Vanilla bean
  • 1 1/4c. Sugar
  • 1/4c. Water
  • 1/4tsp. Salt
  • 2tbsp. Light corn syrup
  • 3/4tsp. Lemon juice
  • 4tbsp. Unsalted Butter
Directions:

For the Flaky Tart Dough: In a small bowl, add the salt to the water and stir to dissolve. Keep very cold until ready to use.

To make the dough in the food processor, put the flour in the work bowl. Cut the butter into 1-inch pieces and scatter the pieces over the flour. Pulse briefly until the mixture forms large crumbs and some of the butter is still in pieces the size of peas. Add the water-and-salt mixture and pulse for several seconds until the dough begins to come together in a ball but is not completely smooth. You should still be able to see some butter chunks.

To make the dough by hand (
I used this method), put the flour in a mixing bowl. Cut the butter into 1-inch pieces and scatter the pieces over the flour. Using a pastry blender or 2 knives, cut the butter into the flour until the mixture forms large crumbs and some of the butter is still in pieces the size of peas. Drizzle in the water-and-salt mixture and stir and toss with a fork until the dough begins to come together in a shaggy mass. Gently mix until the dough comes together into a ball but is not completely smooth. You should still be able to see some butter chunks.

On a lightly floured work surface, divide the dough into 2 equal balls and shape each ball into a disk 1-inch thick (
since I halved the recipe, I only had 1 disk). Wrap well in plastic wrap and chill for at least 2 hours or for up to overnight.

Preheat the oven to 375F

Roll dough out to 1/8-inch thick and place into pie dish. Blind bake the shell for 25mins until the surface looks light brown. Remove the shell from oven and remove the weights, return pie shell to oven and bake until golden brown, about 5 minutes longer.

Let the shell cool completely on a wire rack before filling.

For the Pastry Cream: Have a bowl ready for cooling the pastry cream with a fine-mesh sieve resting on the rim.

Pour the milk into a heavy saucepan. Split the vanilla bean in half lengthwise and use the tip of a sharp knife to scrape the seeds from the pod halves into the milk. Add the salt, place over medium-high heat, and bring to just under a boil, stirring occasionally and making sure that the milk solids are not sticking to the bottom of the pan.

Meanwhile, in a mixing bowl, whisk together the cornstarch and sugar. Add the eggs and whisk until smooth.

When the milk is ready, slowly ladle about one-third of the hot milk into the egg mixture, whisking constantly. Pour the egg-milk mixture back into the hot milk and continue whisking over medium heat until about 2 minutes. I order for the cornstarch to cook ad thicken fully, the mixture must come just to the boiling point. You want to see a few slow bubbles. Remove from heat and immediately pour through the sieve into the bowl. Let cool for 10minutes, stirring occasionally to release the heat and prevent a skim from forming on top.

Cut the butter into 1-tablespoon pieces. When the pastry cream is ready (temp should be at 140F) whisk the butter into the pastry cream 1 tablespoon at a time, always whisking until smooth before adding the next tablespoon.

To cool the cream, cover the bowl with plastic wrap, pressing the wrap directly onto the top of the cream (the plastic wrap prevents a skin from forming on the surface). Chill.

For the Caramel: Pour the cream into a small, heavy saucepan. Split the vanilla bean in half lengthwise and use the tip of a sharp knife to scrape the seeds from the pod halves into the milk. Place over medium-high heart and bring to just under a boil, stirring occasionally. Reduce the heat to low to keep the cream warm (I actually just microwaved the cream for two 25-second intervals once the sugar neared its amber color; saved both stovetop space and the fear of burning the cream).

In a medium, heavy saucepan, combine the sugar, water, salt, and corn syrup. Bring to a boil over medium heat, stirring to dissolve the sugar. Then cook, without stirring, until the mixture is amber colored, 5 to 8 minutes. Remove from heat.

Carefully and slowly add the cream to the sugar syrup. The mixture will boil vigorously at first. Let the mixture simmer down, and then whisk until smooth. Add the lemon juice. Let cool for about 10 minutes.

Cut the butter into 1-inch chunks and add them to the caramel one at a time, whisking constantly after each addition. Then whisk the caramel periodically as it continues to cool.

Final Assembly: Have the pie shell ready for filling. Melt chocolate in a double boiler. Remove from heat. Using a offset spatula, pastry brush, or the back of the spoon, spread the melted chocolate evenly over the bottom of the pie shell. Refrigerate for 10minutes to set the chocolate.

While the chocolate is setting, pour heavy cream into a mixing bowl and whip with a whisk or a mixer fitted with the whisk attachment until thickened. Add the sugar and continue to whip until it holds medium-firm peaks.

Remove the pie shell from the refrigerator and drizzle the caramel evenly over the chocolate. Transfer the pastry cream to the shell. Arrange the banana slices evenly over the pastry cream, and then lightly press them into the cream.

Using an offset or rubber spatula, spread the whipped cream on the top. Cover with chocolate curls and powdered sugar (optional). ENJOY!!!

Chill the pie until the pastry cream is set, at least 3 hours. Serve the pie cool. It will keep in the refrigerator for up to 4 days.