Showing posts with label Fruit. Show all posts

Thursday, March 10, 2011

Baby Showers Bring Chocolates and Flowers

There’s nothing quite like a baby shower to brighten up a chilly winter day! Last week, our office threw a surprise party to celebrate a coworker’s soon-to-be-born child (a huge contrast to our most recent “going-away” party). The conference room was bedecked in pastels and streamers, with (virgin) raspberry-lemonade floats bubbling away in champagne flutes and a variety of baby gifts dressed in picture-perfect wrapping paper. I was asked (once again) to bake something for the occasion, but this was different than the former challenge. Rather than creating a “themed” context for my dessert, I wanted to embrace the history of this time-honored celebration. For some reason, though, all I could picture were Mad Men-style parties with garish decorations and fellow housewives prattling on about diapers and binkies. I’d clearly never been to a baby shower before.
Granted, I am only 23 years-old and have maybe a friend or two with kids, so this isn’t the biggest surprise. This was also a small office occasion for that would be no different than any other work gathering. Still, I was missing a few pieces of the “culture puzzle” so I decided to shy away from tradition; there was no need to make this overcomplicated.
That led to my “duh” moment on what to bake: “simple and classic”. The gifts at a baby shower don’t have to be spectacular, for aren’t we already celebrating life’s greatest gift? An emblem of love, family, and renewal, this is one gift that no amount of money can buy. So, I harnessed the inspiration of my greatest gift, my Mom, to create a “simple and classic” cake: Vanilla Layer Cake with Chocolate Frosting and Chocolate-Covered Strawberries. Okay, so I got a little fancy with the strawberries, but I just couldn’t resist. This recipe was adapted from my favorite blog, SmittenKitchen - I used a basic chocolate buttercream recipe, added strawberries, and made 1 1/2 of the recipe to create three layers as opposed to just two. Enjoy! 
Vanilla Cake with Chocolate Frosting and Chocolate-Covered Strawberries 
Adapted via SmittenKitchen 
Yields: Three 9-inch round, 2-inch tall cake layers

Ingredients:
For Cake: 
  - 6 cups plus 2 tablespoons cake flour (not self-rising)
  - 3 teaspoons baking powder
  - 2 1/4 teaspoons baking soda
  - 1 1/2 teaspoon salt
  - 3 sticks (1 1/2 cups) unsalted butter, softened
  - 3 cups sugar
  - 3 teaspoons pure vanilla extract
  - 6 large eggs, at room temperature
  - 3 cups buttermilk, well-shaken
  - 6 large strawberries, thinly sliced 
For Frosting:
  - 2 cups unsalted butter-
  - 3 tablespoons milk
  - 12 ounces semisweet chocolate, chopped 
  - 1 1/2 teaspoons vanilla extract
  - 3 cups sifted powdered sugar
Strawberries 
  - 12 large strawberries
  - 1 cup chocolate melting discs (or chocolate chips) 

Directions: 
For chocolate-covered strawberries: Place chocolate in a microwave-safe bowl, and microwave at 20-second intervals until fully melted; stirring in between. Let cool for 5 minutes. Dip one strawberry at a time into melted chocolate, and place on wax paper/plate to cool; set aside. 

For cake: Preheat oven to 350°F. Butter two 9-inch round cake pans and line with circles of parchment paper, then butter parchment. (Alternately, you can use a cooking spray, either with just butter or butter and flour to speed this process up.)

Sift together flour, baking powder, baking soda, and salt in a medium bowl. In a large mixing bowl, beat butter and sugar in a large bowl with an electric mixer at medium speed until pale and fluffy, then beat in vanilla. Add eggs 1 at a time, beating well and scraping down the bowl after each addition. At low speed, beat in buttermilk until just combined (mixture will look curdled). Add flour mixture in three batches, mixing until each addition is just Incorporated.

Spread batter evenly in cake pan, then rap pan on counter several times to eliminate air bubbles. (I like to drop mine a few times from two inches up, making a great big noisy fuss.) Bake until golden and a wooden pick inserted in center of cake comes out clean, 35 to 40 minutes. Cool in pan on a rack 10 minutes, then run a knife around edge of pan. Invert onto rack and discard parchment, then cool completely, about 1 hour.

For chocolate frosting: Place chocolate in a microwave-safe bowl, and microwave at 20-second intervals until fully melted; stirring in between. Let cool for 10 minutes. In a large mixing bowl, beat the butter using an electric mixer on MEDIUM speed for about 3 minutes or until creamy. Add the milk carefully and beat until smooth.

Add the melted chocolate and beat well for 2 minutes. Add the vanilla and beat for 3 minutes. Gradually add in the sugar and beat on LOW speed until creamy and of desired consistency.

For assembly: level cakes with a serrated knife if they had domed during baking. Place one layer on a platter and spread 1 cup frosting across, then arrange a layer of sliced strawberries over frosting; repeat with the second layer. Top with third layer, and frost cake all over with remaining frosting. Assemble chocolate-covered strawberries on top and serve.

Monday, January 17, 2011

The Bearable Lightness of Cake Flour

I went against my own baking standards with this one - prior to this cake, I had never used Cake Flour when a recipe called for it. When I decided to make a Classic Genoise for a small dinner party I  was hosting, I thought I would give it a shot. Let's just say the light, fluffy result of this cake made me a convert for the more delicate flour. This cake was fantastic! It was also a chance for me to use my new cookbook holder (basically a plexiglass stand with a splash guard - silly as it seems, it's truly useful). The Joy of Cooking, for those of you don't own it, is a fantastic cookbook, and helped me try out this beautiful cake: Genoise Cake with Grand Marnier Berries and Mascarpone Whipped Cream.  
Cake flour is different from all-purpose given its lower level of protein, or gluten: while regular flour has 10-12% protein, cake flour only has 6-8% (according to JoyofBaking.com). This lower level of gluten is achieved through chlorination, and results in a softer texture. There are two ways to substitute cake flour: one is to under-measure all-purpose flour (as I had always done with past recipes), or to measure ¾ cup all-purpose + 2 tbsp cornstarch for 1 cup cake flour. This recipe calls for sifting the flour twice – I don’t own a sifter, so I use a sieve (see above – also picture is my new cookbook holder!)
This recipe is a little tricky in the start: it calls for heating eggs over simmering water, then beating them with a hand mixer until they reach “au ruban”: a term used for describing the when the batter runs from the spoon in a broad, shining “ribbon”. Above shows the process - the batter will nearly triple in size. The result is a beautiful, light fluffy cake that is perfect with berries, hence my choice of berries macerated with Grand Marnier (Note: this process does not call for cooking the berries, so it will be boozy). Since I've also been on a mascarpone kick lately, I decided to include a Mascarpone Whipped Cream as well.  
Genoise Cake with Grand Marnier Berries and Mascarpone Whipped Cream
Adapted via Joy of Cooking
Yields: 8 to 10 servings

Ingredients
Genoise Cake:
  - 1 1/4 cups sifted cake flour
  - 1/4 cup sugar
  - 1/3 cup unsalted butter, preferably clarified
  - 6 large eggs
  - 3/4 cup sugar
  - 1 teaspoon vanilla extract 
Grand Marnier Berries:
  - 1 (16-oz) package frozen mixed berries
  - 1/3 cup Grand Marnier®
Mascarpone Whipped Cream:
  - 1 1/2 cups heavy whipping cream
  - 1 (8-oz) package mascarpone
  - 1/4 cup powdered sugar
  - 2 teaspoons orange zest 

Directions:
For cake: Grease and flour the bottom(s) of two 9x2-inch pans or one 9-inch springform pan; line with wax or parchment paper. Sift together cake flour and 1/4 cup sugar twice; set aside. Melt butter in a small saucepan; off the heat and let sit for 4 minutes. Once cooled, remove the film from the top; carefully pour into a heatproof bowl, leaving the solids behind - set aside. 

Whisk the eggs and 3/4 cup sugar in a large heatproof bowl; set over a pot of barely simmering water - whisk constantly until the mixture is warm to the touch (about 110 degrees F). Remove the bowl from the heat and beat on high speed until the mixture is lemony-colored, has tripled in volume, and has reached the stage known as au ruban (see photos above) - like a continuous flat ribbon when dropped from a spoon (5 minutes in a heavy-duty mixer with the whisk attachment, 10 - 15 minutes with a hand-held mixer). 

In 3 additions, sift the flour mixture over the top and fold in very gently with a rubber spatula. If the butter has become to solid, reheat briefly and transfer to a medium bowl. Fold about 1 1/2 cups of the egg mixture into the butter until completely incorporated, along with the vanilla extract. Bake until the cake begins to pull away from the sides of the pan(s) and the top springs back when lightly pressed, about 15 minutes in cake pans, 30 minutes in a springform pan. Let cool in the pan(s) on a rack for 10 minutes. Slide a thin knife around the cake to detach it from the pan(s); remove the side of the springform pan, if using. Invert the cake and remove the paper liner(s). Let cool right side up on the rack. 

For berries: While the cake is baking, place all the frozen berries in a glass bowl and pour Grand Marnier on top. Allow 30 to 40 minutes for the berries to macerate and thaw. 

For the mascarpone whipped cream: whip the heavy cream in a large metal bowl, then (using the same hand mixer), whip the mascarpone, sugar and orange zest into a smaller separate bowl.  Fold the mascarpone into the whipped cream.

Slice the cake into wedges and place on individual cakes - spoon berries and sauce onto each slice, and serve with a dollop of the mascarpone whipped cream. 

Sunday, October 3, 2010

Going Bananas for Chocolate


We all reminisce on those days when the simple things were all that mattered: swings sets, grilled cheese sandwiches, snow angels, etc. One favorite staple of my childhood was chocolate banana pops. Granted, that favorite confection has been revisited with chocolate fondues and such, but it's the concept of marrying chocolate with bananas that I'm aiming for here. It's simple, yet irresistible. When I discovered that my friend Zach loves bananas, I knew I had to find a way to utilize this flavor combination for his birthday cake. As such, I unearthed this amazing recipe: Chocolate Banana Cake with White Chocolate Frosting and Chocolate Ganache. 
This recipe has been on my "to-do" list for quite some time. The flavor profiles are profuse, making it a more interesting, colorful dessert than its cousin - the chocolate banana pop. Yet the concept of chocolate and banana is the inspiration here, and both white and dark chocolate have keys roles in this recipe. The cake, a spin on your classic sour cream chocolate cake, is extremely rich and delicious. I do have a small confession - the recipe calls for 3/4 cup of butter, and being highly distracted by the beautiful October morning and scent of fall (my favorite season) I used a whole stick! The cake was still amazing, so I can only credit one of my favorite Southern butter lovers, Paula Deen: “Butter is a very, very beautiful thing." 
This is a highly labor intensive cake, and requires a large amount of downtime (for allowing the cakes to cool, the frosting to set, and more). If the idea interests you, though, this cake would be just as effective in a deconstructed form: cake slices with dollops of frosting and ganache drizzled on top. I mention this because I myself encountered difficulties in assembly - the frosting, have a whipped cream base, is very fragile and doesn't set quite as well as a cream cheese or buttercream frosting. I believe this was partially my fault from over-beating the cream. Additionally, the ganache makes the cake a bit top heavy, so balance also becomes an issue. The photo below illustrates my quandary - nonetheless, this cake is DELICIOUS and I highly recommend it to anyone who misses the classic from their childhood.
Chocolate Banana Cake with White Chocolate Frosting and Chocolate Ganache 
Adapted from Canadian Living Magazine
Serves 12-14 

Ingredients
Cake:

- 3/4 cup butter, softened

- 1 cup sugar

- 3 eggs

- 1 1/t tsp vanilla

- 1/2 cup sour cream

- 3 cups cake flour
 (I used, as always, loosely-measure all-purpose flour, leaving about 1/2 inch at top) 
- 1 1/2 tsp baking soda

- 4 oz semi-sweet chocolate, chopped
 (I used Baker's)
- 1 1/2 cups mashed bananas


White Chocolate Icing:

- 3 cups whipping cream

- 10 oz white chocolate, chopped
 (I used white chocolate chips) 
- 1 tsp vanilla


Dark Chocolate Ganache:

- 1/2 cup whipping cream

- 4 oz semi-sweet chocolate, chopped


Garnish:

- 4 bananas, sliced

- 1 oz melted chocolate


Directions
For cake: Grease two 8 1/2 inch cake pans, then line with parchment paper and grease and flour. Cream butter and sugar until fluffy. Beat in eggs, one at a time, then vanilla. Beat in sour cream and banana. Combine flour, baking soda and chocolate. Add in 3 additions to creamed mixture. Mix until wet.

 Spoon into cake pans. Bake at 350F for 35 to 40 minutes. Let cool on rack for 20 minutes. Remove from pans. Let cool completely.


For white chocolate icing: In sauce pan, bring half of cream to a boil, pour over chocolate in bowl, whisking until melted. Add vanilla. Chill until cooled (1 hour, whisking often).

 Beat chocolate and cream just until ridges hold shape. Beat remaining cream just until soft peaks form. Gently fold cream into chocolate cream. 


For assembly: Slice cakes in half horizontally. Spread each layer with about 3/4 cup of white chocolate icing and a layer of sliced bananas. Using a palette knife cover cake with a remaining icing and chill until firm (about 1 1/2 hours).

For ganache: bring 1/2 cup cream to a boil, pour over chocolate. Whisk until melted and let cool 20 minutes until room temperature but still pourable. Pour over cake, letting some run down the sides.
 Drizzle melted chocolate over remaining banana slices and arrange on top of cake.

Sunday, August 29, 2010

"...it Don't Matter if You're Black or White"

For those of you who are unfamiliar with that title, I highly recommend you visit this link - it's Michael Jackson's "Black or White". My love of MJ goes back as far as I can remember, and these cupcakes were a token of said appreciation.  I had considered making a white chocolate and dark chocolate entry for a while based solely on this song. 
I baked these for a friend's BBQ birthday party who just so happened to be turning 24, and I wanted to bake 12 of each: Dark Chocolate Cupcakes with Peanut Butter Filling and White Chocolate Cupcakes with Raspberry Filling.
                             
The dichotomy of white chocolate and dark chocolate is a beautiful presentation. Yet it should be noted that white chocolate is in fact NOT a true chocolate due to the lack of chocolate liquor. It consists of cocoa butter, sugar, milk solids, and vanilla. Nonetheless, it has an amazing flavor that is highly complimented by tarter flavors, such as raspberry.
Dark chocolate, on the other hand, is the "true chocolate", where sugar and fat are the only additives to cacao, with no milk. Coffee, like my last entry indicates, pairs beautifully with chocolate.

While I appreciated the concept of white and dark chocolate being opposing flavors, I wanted to add another profile to the two cupcake types. As such, I chose to use the "cone method" (see left) and fill the cupcakes. The basic process behind this is dragging a knife in a conical fashion to create a basin, which can then be filled with whatever filling is desired. The cone end is then cut off, leaving a cap with which to cover the filling. For these cupcakes, I chose to use raspberry for the white chocolate, and peanut butter for the dark chocolate. While I simply used plain raspberry preserves for the former, I made a mixture of cream cheese, peanut butter, and milk for the latter. The basic measurements were 2 ounces of cream cheese, 1/2 cup creamy peanut butter, and a splash or two of milk. I mixed these items together until the mixture resembled a caramel whipped cream. The result for each filling was absolutely delicious! 

One small side note: the white chocolate cupcakes turned out beautifully shape-wise, whereas the chocolate cupcakes had appearances that resembled mushrooms. Nonetheless, they still tasted wonderful!
White Chocolate Cupcakes with Raspberry Filling and White Chocolate Frosting 
adapted via CAKE ON THE BRAIN and Diana's Desserts
Serves 12


Ingredients:
Cupcakes
  • 1 cup all-purpose flour
  • 3/4 cup sugar
  • 1/8 teaspoon salt
  • 2 oz white chocolate
  • 1/4 cup water
  • 1/4 cup butter
  • 1/2 cup sour cream, at room temperature
  • 1 tsp vanilla
  • 3/4 tsp baking soda
  • Raspberry preserves (optional)
Frosting
  • 4 1/2 ounces white chocolate, finely chopped
  • 1 3/4 cups confectioners' sugar
  • 1/4 cup milk
  • 1/2 teaspoon vanilla extract
  • 6 tbsp (3/4 stick/3 oz./85g) unsalted butter, softened
  • Pinch of salt
Directions
For cupcakes: Preheat oven to 350F. Melt chocolate with butter and water. Allow to cool slightly.In mixer, combine flour, sugar and salt. Add melted chocolate mixture to flour mixture and mix lightly. Add sour cream, vanilla, baking soda and egg and beat for 2 minutes. Divide batter evenly into cupcake liners and bake for 30 - 35 minutes Place pan on a rack for 10 minutes to cool. Allow cupcakes to cool completely before frosting.


For filling: if choosing to fill these cupcakes, use the "cone method" mentioned above, then fill each cupcake with about a spoonful of the preserves.


For frosting: Melt the white chocolate in a double boiler. Stir until smooth. Cool to room temp. Sift the confectioners' sugar into a medium bowl. Stir in the milk and vanilla. Add the butter and salt and beat until smooth. Stir in the cooled white chocolate. Refrigerate until firm enough to frost the cupcakes, about 30 minutes.
Dark Chocolate Cupcakes with Peanut Butter Filling and Dark Chocolate Frosting
adpated via Ghirardelli 
Serves 12

Ingredients:
Cupcakes
  • 1/4 cup Unsweetened Cocoa
  • 1 1/8 cup all-purpose flour
  • 1 1/4 teaspoon baking soda
  • 1/4 teaspoon salt
  • 1 large egg
  • 1/2 cup firmly packed light brown sugar
  • 1/2 cup granulated white sugar
  • 5/8 cup whole milk
  • 1/3 cup strong brewed coffee or espresso
  • 1/2 cup (or 1 stick) unsalted butter 
Filling
  • 2 ounces cream cheese
  • 1/2 cup creamy peanut butter
  • 2-3 tbsp milk
Frosting
  • 4 1/2 ounces semisweet chocolate, finely chopped
  • 1 3/4 cups confectioners' sugar
  • 1/4 cup milk
  • 1/2 teaspoon vanilla extract
  • 6 tbsp (3/4 stick/3 oz./85g) unsalted butter, softened
  • Pinch of salt
Directions:
For cupcakes: Preheat the oven to 350°F. Line 12 cupcake molds or muffin tins with paper liners or spray with nonstick spray. To make the cupcakes, sift together the flour, cocoa, baking soda and salt. In a medium bowl, whisk together the egg, brown sugar, and white sugar. Whisk in the milk, coffee, and melted butter. Whisk in the dry ingredients. Divide the batter evenly among the cupcake molds, filling them about three-quarters full.

Bake for 15 minutes, or until a tester inserted in the middle of the cupcakes comes out clean. Cool for 10 minutes. Using a small spatula or knife, remove the cupcakes from the pan. Continue to cool on a wire rack to room temperature. 

For filling: combine peanut butter and cream cheese and mix for several minutes - it should look light and fluffy. Add the milk as needed.

For frosting: Melt the chocolate in a double boiler. Stir until smooth. Cool to room temp. Sift the confectioners' sugar into a medium bowl. Stir in the milk and vanilla. Add the butter and salt and beat until smooth. Stir in the cooled white chocolate. Refrigerate until firm enough to frost the cupcakes, about 30 minutes.

Saturday, July 10, 2010

"Carrots are divine... You get a dozen for a dime, It's maaaa-gic!"

We all know Bugs Bunny can't resist the temptation of a carrot (as shown in the title of this post). And the ever-expanding healthy movement has embraced it's nutritional values as the perfect snacking commodity (especially with hummus, a personal favorite!). But who ever got the idea to put carrots into a dessert?

According to Wikipedia, using carrots as a sweetening agent has been in effect since medieval times, given it was more affordable and readily available than conventional sweeteners. The carrot was a good substitute because, like the sugar beet, it has a higher sugar content than other vegetables. Sweet and cheap? Bugs Bunny couldn't have put it better...
Now that I've ranted about carrots, I should confess that this cake by no means solely depends on the sugar content of the carrot. It packs a LOT of flavor, and is a bit more of an intense carrot cake than the one grandma used to make. Nonetheless, I can guarantee you won't be disappointed.

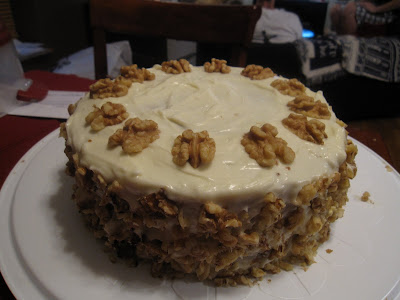
Now let's talk about this cake - the recipe comes from one of my favorite blogs, SimplyRecipes, and is apparently a family heirloom. I made this for a trumpet friend of mine, Tom Daniels - granted, his birthday had been several weeks prior, but I keep my word. Obviously we have carrots, but there are two power ingredients in this recipe that caught my attention. The secret to a great carrot cake is getting the perfect moist texture. Most recipes use oil (from safflower to olive, the latter being what I used), but some call for either crushed pineapple or applesauce as well. This one uses crushed pineapple, a flavor I feel pairs better with carrot in this instance. But it was the addition of shredded COCONUT that made me realize this was an offer I couldn't refuse.
I warned you this was an intense carrot cake. But I've always had the "sky's the limit" approach when trying new baking recipes, so this was right up my alley. That being said, there are plenty of other recipes out there worth trying. One recipe I can personally recommend is from the Joy of Baking. I just couldn't resist that coconut...
Okay, so I slipped up on this recipe - I completely forgot to add the walnuts to the batter. To my credit, it was 95 DEGREES outside, and thinking becomes a little cloudy when you are standing in a kitchen, while preheating an oven, and the weather feels as though it could bake a cake itself (also my excuse for not having as many photos during the process). My solution? Add the nuts (even more finely chopped than what the recipe calls for) to the cream cheese icing! So it sort of defeat the purpose, but that killer set of ingredients did their job without fail and it still turned out to be an AMAZING cake!
Notes: I used unsweetened coconut and added about 1 tsp of confectioner's sugar and a few drop of water. The recipe says it will take about 45 - 50 minutes, whereas mine took about 40 - 42. Make sure to check after 35 just to be safe. Also (as reflected in the directions) I mixed the ingredients a little differently than called for to a) allow better incorporation and b) prevent the works from flying all over my kitchen.

Carrot Cake Recipe
Adapted from SimplyRecipes
Serves 12-16

Ingredients
Cake

  • 3 cups unbleached all-purpose flour
  • 2 cups sugar
  • 1 teaspoon salt
  • 1 Tbsp baking soda
  • 1 Tbsp cinnamon
  • 1 1/2 cups olive oil or grapeseed oil
  • 4 large eggs, lightly beaten
  • 1 Tbsp vanilla extract
  • 1 1/2 cups shelled walnuts, chopped (what I left out, oops! Reserve extra for garnish)
  • 1 1/2 cups sweetened, shredded coconut (I used unsweetened + 1 tsp powdered sugar)
  • 2 cups of finely grated carrots
  • 1 cup of drained crushed pineapple
Frosting
  • 8 oz cream cheese, at room temperature
  • 6 Tbsp unsalted butter, room temp
  • 2 1/2 cups of confectioners' sugar
  • 1 teaspoon vanilla extract
  • 2 Tbsp lemon juice
  • (technically this is where the walnuts fell in my own creation)


Directions

For Cake: Preheat oven to 350°F. Butter and flour two 9-inch cake pans. Sift dry ingredients into the bowl of a stand mixer (or a large mixing bowl if using a hand mixer). Combine oil, eggs, and vanilla in a separate bowl (I would suggest a wet measure cup or comparably sized pitcher to allow easy pouring). Slowly incorporate the wet ingredients into the dry, beating on a low speed after every addition. Once all the oil mixture has been incorporated, make sure to beat well. Fold in chopped walnuts, coconut, carrots and pineapple (or in my case, forget about the walnuts, haha!)
Pour batter into pans. Set on the middle rack of oven and bake for 45-50 minutes (shift positions of cakes front-to-back if necessary about halfway through), until edges have pulled away from sides and a toothpick or sharp knife tip inserted into the center of the cake comes out clean. Cool on a cake rack.
For Icing: Cream together the cream cheese and butter in a mixing bowl. Slowly sift in the confectioners sugar and beat until mixture is free of lumps. Stir in vanilla and lemon juice.
For Assembly: Once cakes have cooled, place one layer, flat side down, on a cake plate/caddy/presentation platter of choosing and spread about 1/2-cup of frosting over top. Top with second layer and frost the remainder of the cake. Sprinkle top with chopped walnuts or arrange walnut halves in a crown around the top (Note: if you forgot the nuts, like me, then feel free to add them in between the layers as well as around the cake).
Win

Sunday, June 20, 2010

When Chocolate met Raspberry - A Match made in Heaven


There are always those standard flavors that pair together as though they were a meant to be - strawberry and banana, butter and pecan, peanut butter and jelly, etc. But when you pair raspberry and chocolate, it takes true love to a whole new level. Naturally, most fruits pair quite while with chocolate. Most of us have had chocolate-covered strawberries (to DIE for!) or dipped slices of banana in melted chocolate fondue. But raspberries "take the cake" on being paired with chocolate, and this cake definitely proved that.
Confession: I found a recipe and did not agree with it. It called for not 1, not 2, but THREE cups of sugar. Mind you, this was for two 9-inch cakes...that's a LOT of sugar, at least based on my experience. As such, I cut out an entire cup. I also used instant coffee (even though the recipe calls for "freshly brewed"). Honestly? When drinking coffee, you know when you've got the real deal versus the "short-cut". When baking with coffee, who cares? It's the flavor that counts, and coffee flavor within a recipe context doesn't necessarily need from the finest Costa Rican roast available on the market! In other words, NesCafe is just as good as any ground/full bean coffee you could use when baking. The addition of coffee makes the batter quite thin, so don't get nervous when you end up with batter the consistency of chocolate milk.
This recipe is from Taste of Home, but as aforementioned I chose to deviate from the original quite a bit. The frosting seemed too sweet and the filling seemed to dense. So I chose the following combination: a Taste of Home cake recipe, a Raspberry Whipped Cream Filling recipe, and a simple Chocolate Ganache recipe to top it all off. I hope you enjoy this recipe - my only word of caution: careful not to be carrying/wearing anything of great import. The danger of having chocolate ganache rub off on you sleeve/bag is huge! (but melted chocolate is still a beautiful thing)
You will notice in the post at the end of this article that there appear to be "three" layers of cake, rather than the two this recipe creates. That results from my having a cake pan that is a 9-in pan and one that is a 9 3/4-in pan. The latter, even though it's only 3/4 of an inch larger than the former, creates cake that are nearly twice the size of the other one! For this recipe, I simply added a little more to that pan, baked it longer, then cut it in half to create a third layer. Regardless, I plan to buy a pan that actually matches either of the ones I currently have so as to not have to end up with disproportionate cake layers.
Chocolate Cake with Raspberry Cream Filling and Chocolate Ganache
adapated via Taste of Home
Serves 10-12

Ingredients

Chocolate Cake
  • 2 cups sugar
  • 2 3/4 cups all-purpose flour
  • 1 cup baking cocoa
  • 2 teaspoons baking soda
  • 1 1/2 teaspoons salt
  • 3/4 teaspoon baking powder
  • 1 1/4 cups buttermilk
  • 3/4 cup canola oil
  • 3 teaspoons vanilla extract
  • 3 eggs
  • 1 1/2 cups strong brewed coffee, room temperature
Raspberry Cream Filling
  • 1 cup heavy cream
  • 1- 2 tbsp sugar
  • 1/2 tsp vanilla extract
  • 1/2 cup raspberry preserves
Chocolate Ganache
  • 1 cup heavy cream
  • 1/2 tsp vanilla extract
  • 1 1/2 cups semisweet chocolate chips
Directions

For Cake: Line three greased 9-in. round baking pans with waxed paper and grease paper; set aside. In a large bowl, combine the first six ingredients. Combine the buttermilk, oil and vanilla; add to the dry ingredients. Add eggs, one at a time, beating well after each addition; beat for 2 minutes. Gradually add coffee (batter will be thin).

Pour batter into prepared pans. Bake at 350° for 35-40 minutes or until a toothpick inserted near the center comes out clean. Cool for 10 minutes before removing from pans to wire racks to cool completely; discard waxed paper.

For Raspberry Cream Filling: Whisk cream in a bowl until soft peaks begin to form, gradually adding in the vanilla and sugar. Gently fold in the preserves.

For Chocolate Ganache: Place semisweet chocolate chips in a glass bowl and set aside. Heat heavy cream and vanilla in a small saucepan over medium heat. Just as it begins to boil, remove from heat and pour over chocolate chips; let sit for 5 minutes. Then, gradually whisk starting from the center until all the chocolate is melted and incorporated. Chill for 5 minutes, so that it thickens but is still pourable.

For Assembly: If the cakes have domed too much during the baking process, level them a bit using a long knife. Place one layer, flat side down, on a cake plate. Spread cream filling to within a 1/2-inch margin of the layer, then place the second layer on top. Pour the ganache over the cakes and, using an offeset spatula, spread the ganache that pools at the bottom back up the sides of the cakes.

Sunday, June 13, 2010

Going Bananas for Banana Cream Pie (From Scratch!!!)


Okay, so while Banana Cream Pie is arguably an American Classic, this recipe was by no means "simple as pie". EVERYTHING was from scratch, and the smallest mishap with any component of this recipe could lead to disaster. Now naturally there's always the old-fashioned go-to for this recipe: a pre-bought pie crust from the frozen foods aisle with a prepared package of Jello Pudding to fill it. This recipe, though, refuses to except the old norm and took my pastry challenges to a different level.

I will admit - the frozen pie shell is truly a Godsend. It allows you to wait up until the last possible moment to prepare everything since it's all ready to go! But trust me, a homemade pie crust is by no means imitable, and once you finally learn how to do it you will find yourself avoiding the frozen pastry aisle at the grocery store quite readily. This particular pie crust required a blind baking period as the filling is not cooked within the shell. For this, you can use one of two things: actual pie weight or dried beans (as I did). Once done with the step, you can store the beans and make them your official "blind baking weights" since you won't want to cook with them after this process.
I can guarantee this is one of the flakiest, most flavorful pie crusts you will ever try! The photos do it little justice. The trick behind this amazing pastry is not overdoing it - cutting the butter the right number of times, folding the dough gently to incorporate the water, and rolling the dough just enough to form a ball will create a buttery, flaky crust you won't be able to resist!
Now here is an ingredient many don't see that often - the vanilla bean. Vanilla extract has made the versatile ingredient more accessible and affordable, but in its natural form vanilla becomes a true powerhouse of flavor. Not only do we get a greater depth to the essence of the bean, but it also adds a wonderful visual aesthetic. While extract can easily replace vanilla bean
Caramel is a beautiful addition to any dessert, but making it from scratch? I've made my own caramel in a previous post, and as before it's presence made the dessert. Always make sure to watch the sugar carefully - it can burn on the turn of a dime. Just as soon as the edges begin to get that deep amber color, remove it from the heat and let stir in the the heavy cream. This is the dangerous part as that cream will bubble up a LOT. Make sure to use a deep enough pan to prevent overflow.
The assembly of this cake is the best part. The pastry cream chilling in the fridge, the caramel cooling off to the side, and the pie crust is ready to be filled. Once the chocolate is melted, it and the caramel create the base of the filling, followed by the pastry cream, and finally the bananas. This recipe was created to fill a 10-inch crust, and since I used a 9-inch pie plate, I halved the dough recipe and had leftover caramel. The cream I simply filled to the top regardless (because it was just that good!) Trust me, I can guarantee your friends and guests will be craving seconds. Enjoy!
Banana Cream Pie with Homemade Caramel and Chocolate Crust
Adapted from ana_muh_rae
Serves 8 - 10

Ingredients:
  • (one) Fully Baked and Cooled 10-inch Flaky Tart Dough Pie Shell (below)
  • 3oz Bittersweet chocolate coarsely chopped (I used semisweet chocolate chips)
  • 1c. Heavy Cream (very cold)
  • 2tbsp. Sugar
  • 1/3c. Caramel (recipe below)
  • 2 1/2c. Pastry Cream (recipe below)
  • 2 Ripe Bananas, sliced into 1/4-inch-thick rounds
  • 3oz Bittersweet chocolate bar for making curl (I used Ghiradelli 60% Cocoa)
Flaky Tart Dough (makes enough for one 10-in crust or two 9-in crusts)
  • 1 tsp Salt
  • 2/3 cup Water, very cold
  • 3 cups + 2 tbsp all-purpose flour
  • 1 cup + 5 tbsp unsalted butter, very cold
Pastry Cream (2 1/2 cups)
  • 2 cups Whole Milk
  • 1/2 Vanilla bean
  • 1/4 tsp. Salt
  • 4 tbsp. Cornstarch
  • 1/2 cups + 1tbsp Sugar
  • 2 Large eggs
  • 4tbsp. Unsalted butter
Caramel (makes 1 1/2 cups)
  • 2/3c. Heavy cream
  • 1/4 Vanilla bean
  • 1 1/4c. Sugar
  • 1/4c. Water
  • 1/4tsp. Salt
  • 2tbsp. Light corn syrup
  • 3/4tsp. Lemon juice
  • 4tbsp. Unsalted Butter
Directions:

For the Flaky Tart Dough: In a small bowl, add the salt to the water and stir to dissolve. Keep very cold until ready to use.

To make the dough in the food processor, put the flour in the work bowl. Cut the butter into 1-inch pieces and scatter the pieces over the flour. Pulse briefly until the mixture forms large crumbs and some of the butter is still in pieces the size of peas. Add the water-and-salt mixture and pulse for several seconds until the dough begins to come together in a ball but is not completely smooth. You should still be able to see some butter chunks.

To make the dough by hand (
I used this method), put the flour in a mixing bowl. Cut the butter into 1-inch pieces and scatter the pieces over the flour. Using a pastry blender or 2 knives, cut the butter into the flour until the mixture forms large crumbs and some of the butter is still in pieces the size of peas. Drizzle in the water-and-salt mixture and stir and toss with a fork until the dough begins to come together in a shaggy mass. Gently mix until the dough comes together into a ball but is not completely smooth. You should still be able to see some butter chunks.

On a lightly floured work surface, divide the dough into 2 equal balls and shape each ball into a disk 1-inch thick (
since I halved the recipe, I only had 1 disk). Wrap well in plastic wrap and chill for at least 2 hours or for up to overnight.

Preheat the oven to 375F

Roll dough out to 1/8-inch thick and place into pie dish. Blind bake the shell for 25mins until the surface looks light brown. Remove the shell from oven and remove the weights, return pie shell to oven and bake until golden brown, about 5 minutes longer.

Let the shell cool completely on a wire rack before filling.

For the Pastry Cream: Have a bowl ready for cooling the pastry cream with a fine-mesh sieve resting on the rim.

Pour the milk into a heavy saucepan. Split the vanilla bean in half lengthwise and use the tip of a sharp knife to scrape the seeds from the pod halves into the milk. Add the salt, place over medium-high heat, and bring to just under a boil, stirring occasionally and making sure that the milk solids are not sticking to the bottom of the pan.

Meanwhile, in a mixing bowl, whisk together the cornstarch and sugar. Add the eggs and whisk until smooth.

When the milk is ready, slowly ladle about one-third of the hot milk into the egg mixture, whisking constantly. Pour the egg-milk mixture back into the hot milk and continue whisking over medium heat until about 2 minutes. I order for the cornstarch to cook ad thicken fully, the mixture must come just to the boiling point. You want to see a few slow bubbles. Remove from heat and immediately pour through the sieve into the bowl. Let cool for 10minutes, stirring occasionally to release the heat and prevent a skim from forming on top.

Cut the butter into 1-tablespoon pieces. When the pastry cream is ready (temp should be at 140F) whisk the butter into the pastry cream 1 tablespoon at a time, always whisking until smooth before adding the next tablespoon.

To cool the cream, cover the bowl with plastic wrap, pressing the wrap directly onto the top of the cream (the plastic wrap prevents a skin from forming on the surface). Chill.

For the Caramel: Pour the cream into a small, heavy saucepan. Split the vanilla bean in half lengthwise and use the tip of a sharp knife to scrape the seeds from the pod halves into the milk. Place over medium-high heart and bring to just under a boil, stirring occasionally. Reduce the heat to low to keep the cream warm (I actually just microwaved the cream for two 25-second intervals once the sugar neared its amber color; saved both stovetop space and the fear of burning the cream).

In a medium, heavy saucepan, combine the sugar, water, salt, and corn syrup. Bring to a boil over medium heat, stirring to dissolve the sugar. Then cook, without stirring, until the mixture is amber colored, 5 to 8 minutes. Remove from heat.

Carefully and slowly add the cream to the sugar syrup. The mixture will boil vigorously at first. Let the mixture simmer down, and then whisk until smooth. Add the lemon juice. Let cool for about 10 minutes.

Cut the butter into 1-inch chunks and add them to the caramel one at a time, whisking constantly after each addition. Then whisk the caramel periodically as it continues to cool.

Final Assembly: Have the pie shell ready for filling. Melt chocolate in a double boiler. Remove from heat. Using a offset spatula, pastry brush, or the back of the spoon, spread the melted chocolate evenly over the bottom of the pie shell. Refrigerate for 10minutes to set the chocolate.

While the chocolate is setting, pour heavy cream into a mixing bowl and whip with a whisk or a mixer fitted with the whisk attachment until thickened. Add the sugar and continue to whip until it holds medium-firm peaks.

Remove the pie shell from the refrigerator and drizzle the caramel evenly over the chocolate. Transfer the pastry cream to the shell. Arrange the banana slices evenly over the pastry cream, and then lightly press them into the cream.

Using an offset or rubber spatula, spread the whipped cream on the top. Cover with chocolate curls and powdered sugar (optional). ENJOY!!!

Chill the pie until the pastry cream is set, at least 3 hours. Serve the pie cool. It will keep in the refrigerator for up to 4 days.