Sunday, June 20, 2010

When Chocolate met Raspberry - A Match made in Heaven


There are always those standard flavors that pair together as though they were a meant to be - strawberry and banana, butter and pecan, peanut butter and jelly, etc. But when you pair raspberry and chocolate, it takes true love to a whole new level. Naturally, most fruits pair quite while with chocolate. Most of us have had chocolate-covered strawberries (to DIE for!) or dipped slices of banana in melted chocolate fondue. But raspberries "take the cake" on being paired with chocolate, and this cake definitely proved that.
Confession: I found a recipe and did not agree with it. It called for not 1, not 2, but THREE cups of sugar. Mind you, this was for two 9-inch cakes...that's a LOT of sugar, at least based on my experience. As such, I cut out an entire cup. I also used instant coffee (even though the recipe calls for "freshly brewed"). Honestly? When drinking coffee, you know when you've got the real deal versus the "short-cut". When baking with coffee, who cares? It's the flavor that counts, and coffee flavor within a recipe context doesn't necessarily need from the finest Costa Rican roast available on the market! In other words, NesCafe is just as good as any ground/full bean coffee you could use when baking. The addition of coffee makes the batter quite thin, so don't get nervous when you end up with batter the consistency of chocolate milk.
This recipe is from Taste of Home, but as aforementioned I chose to deviate from the original quite a bit. The frosting seemed too sweet and the filling seemed to dense. So I chose the following combination: a Taste of Home cake recipe, a Raspberry Whipped Cream Filling recipe, and a simple Chocolate Ganache recipe to top it all off. I hope you enjoy this recipe - my only word of caution: careful not to be carrying/wearing anything of great import. The danger of having chocolate ganache rub off on you sleeve/bag is huge! (but melted chocolate is still a beautiful thing)
You will notice in the post at the end of this article that there appear to be "three" layers of cake, rather than the two this recipe creates. That results from my having a cake pan that is a 9-in pan and one that is a 9 3/4-in pan. The latter, even though it's only 3/4 of an inch larger than the former, creates cake that are nearly twice the size of the other one! For this recipe, I simply added a little more to that pan, baked it longer, then cut it in half to create a third layer. Regardless, I plan to buy a pan that actually matches either of the ones I currently have so as to not have to end up with disproportionate cake layers.
Chocolate Cake with Raspberry Cream Filling and Chocolate Ganache
adapated via Taste of Home
Serves 10-12

Ingredients

Chocolate Cake
  • 2 cups sugar
  • 2 3/4 cups all-purpose flour
  • 1 cup baking cocoa
  • 2 teaspoons baking soda
  • 1 1/2 teaspoons salt
  • 3/4 teaspoon baking powder
  • 1 1/4 cups buttermilk
  • 3/4 cup canola oil
  • 3 teaspoons vanilla extract
  • 3 eggs
  • 1 1/2 cups strong brewed coffee, room temperature
Raspberry Cream Filling
  • 1 cup heavy cream
  • 1- 2 tbsp sugar
  • 1/2 tsp vanilla extract
  • 1/2 cup raspberry preserves
Chocolate Ganache
  • 1 cup heavy cream
  • 1/2 tsp vanilla extract
  • 1 1/2 cups semisweet chocolate chips
Directions

For Cake: Line three greased 9-in. round baking pans with waxed paper and grease paper; set aside. In a large bowl, combine the first six ingredients. Combine the buttermilk, oil and vanilla; add to the dry ingredients. Add eggs, one at a time, beating well after each addition; beat for 2 minutes. Gradually add coffee (batter will be thin).

Pour batter into prepared pans. Bake at 350° for 35-40 minutes or until a toothpick inserted near the center comes out clean. Cool for 10 minutes before removing from pans to wire racks to cool completely; discard waxed paper.

For Raspberry Cream Filling: Whisk cream in a bowl until soft peaks begin to form, gradually adding in the vanilla and sugar. Gently fold in the preserves.

For Chocolate Ganache: Place semisweet chocolate chips in a glass bowl and set aside. Heat heavy cream and vanilla in a small saucepan over medium heat. Just as it begins to boil, remove from heat and pour over chocolate chips; let sit for 5 minutes. Then, gradually whisk starting from the center until all the chocolate is melted and incorporated. Chill for 5 minutes, so that it thickens but is still pourable.

For Assembly: If the cakes have domed too much during the baking process, level them a bit using a long knife. Place one layer, flat side down, on a cake plate. Spread cream filling to within a 1/2-inch margin of the layer, then place the second layer on top. Pour the ganache over the cakes and, using an offeset spatula, spread the ganache that pools at the bottom back up the sides of the cakes.

Wednesday, June 16, 2010

"The Cake Before Time" - Cake Decorating taken to a WHOLE New Level


When my friend Diana, a trumpet player at NEC, sent me an email with several cake concepts for her birthday cake, there was only one that we both knew was the trump card. Granted, I almost never take requests when it comes to recipes, but this challenge was just too good to be true. So when I decided to make a Dinosaur Cake (no novelty cake pans used here!) Frosting + Cut cake pieces = crumbly disaster!!! Okay, so it wasn't necessarily the end of the world, but having been my first attempt at frosting a uniquely shaped cake, it proved rather frustrating.
My first piece of advice: do NOT frost this cake all at once. That delicious buttercream frosting was not made to last for generations, and it will start to melt considering this is no ordinary frosting job. I occasionally took breaks and would place the tub of frosting into the freezer for a few minutes. This allowed the buttercream to stiffen enough that I wouldn't have to worry about it running down the sides of the cake (or in this case, down the tail of the dinosaur, haha!) My second piece of advice: make the cakes the night before. Letting them chill in the refrigerator overnight will make your life sooo much easier when approaching this recipe. I made the buttercream frosting the day of and let it sit in the fridge for 3o minutes prior to decorating. Slow and steady wins the race, as they say, and this is more than true when applied to decorating this cake.
That being said, a lot of people, when I create cakes like this, ask what I place more importance upon: the overall appearance or the taste of the actual cake? Now I affiliate the latter part of that question with the show Ace of Cakes. What has become the culinary equivalent of the Real World or American Chopper, this show follows a crew of pastry decorators who bake and create show-stopping cakes. Yet recent criticism has been drawn based on the fact that, while their cakes look stunning, they don't necessarily follow through on taste.

My opinion: NEVER sacrifice the taste of a cake for a recipe. I am all for making a cake with that "wow" factor but only if it follows through on taste. As such, I used my go-to chocolate cake recipe for this dinosaur: Hershey's "Perfectly Chocolate" Chocolate Cake. Those who had the chance to enjoy this cake LOVED it!!!

The spikes were little cocoa cookies I bought from whole foods, and I also added some sugar sprinkles as well (since, as aforementioned, this was a crumbly mess to start and a lot of the cake crumbs ended up in the frosting). Next time I make this, I might try a butter cake to lessen the crumb factor. But honestly I can't imagine recreating this design for anything other than a nephew's or friend's son's birthday party. Yet Diana, who LOVES dinosaurs, couldn't have been happier.

Sunday, June 13, 2010

Going Bananas for Banana Cream Pie (From Scratch!!!)


Okay, so while Banana Cream Pie is arguably an American Classic, this recipe was by no means "simple as pie". EVERYTHING was from scratch, and the smallest mishap with any component of this recipe could lead to disaster. Now naturally there's always the old-fashioned go-to for this recipe: a pre-bought pie crust from the frozen foods aisle with a prepared package of Jello Pudding to fill it. This recipe, though, refuses to except the old norm and took my pastry challenges to a different level.

I will admit - the frozen pie shell is truly a Godsend. It allows you to wait up until the last possible moment to prepare everything since it's all ready to go! But trust me, a homemade pie crust is by no means imitable, and once you finally learn how to do it you will find yourself avoiding the frozen pastry aisle at the grocery store quite readily. This particular pie crust required a blind baking period as the filling is not cooked within the shell. For this, you can use one of two things: actual pie weight or dried beans (as I did). Once done with the step, you can store the beans and make them your official "blind baking weights" since you won't want to cook with them after this process.
I can guarantee this is one of the flakiest, most flavorful pie crusts you will ever try! The photos do it little justice. The trick behind this amazing pastry is not overdoing it - cutting the butter the right number of times, folding the dough gently to incorporate the water, and rolling the dough just enough to form a ball will create a buttery, flaky crust you won't be able to resist!
Now here is an ingredient many don't see that often - the vanilla bean. Vanilla extract has made the versatile ingredient more accessible and affordable, but in its natural form vanilla becomes a true powerhouse of flavor. Not only do we get a greater depth to the essence of the bean, but it also adds a wonderful visual aesthetic. While extract can easily replace vanilla bean
Caramel is a beautiful addition to any dessert, but making it from scratch? I've made my own caramel in a previous post, and as before it's presence made the dessert. Always make sure to watch the sugar carefully - it can burn on the turn of a dime. Just as soon as the edges begin to get that deep amber color, remove it from the heat and let stir in the the heavy cream. This is the dangerous part as that cream will bubble up a LOT. Make sure to use a deep enough pan to prevent overflow.
The assembly of this cake is the best part. The pastry cream chilling in the fridge, the caramel cooling off to the side, and the pie crust is ready to be filled. Once the chocolate is melted, it and the caramel create the base of the filling, followed by the pastry cream, and finally the bananas. This recipe was created to fill a 10-inch crust, and since I used a 9-inch pie plate, I halved the dough recipe and had leftover caramel. The cream I simply filled to the top regardless (because it was just that good!) Trust me, I can guarantee your friends and guests will be craving seconds. Enjoy!
Banana Cream Pie with Homemade Caramel and Chocolate Crust
Adapted from ana_muh_rae
Serves 8 - 10

Ingredients:
  • (one) Fully Baked and Cooled 10-inch Flaky Tart Dough Pie Shell (below)
  • 3oz Bittersweet chocolate coarsely chopped (I used semisweet chocolate chips)
  • 1c. Heavy Cream (very cold)
  • 2tbsp. Sugar
  • 1/3c. Caramel (recipe below)
  • 2 1/2c. Pastry Cream (recipe below)
  • 2 Ripe Bananas, sliced into 1/4-inch-thick rounds
  • 3oz Bittersweet chocolate bar for making curl (I used Ghiradelli 60% Cocoa)
Flaky Tart Dough (makes enough for one 10-in crust or two 9-in crusts)
  • 1 tsp Salt
  • 2/3 cup Water, very cold
  • 3 cups + 2 tbsp all-purpose flour
  • 1 cup + 5 tbsp unsalted butter, very cold
Pastry Cream (2 1/2 cups)
  • 2 cups Whole Milk
  • 1/2 Vanilla bean
  • 1/4 tsp. Salt
  • 4 tbsp. Cornstarch
  • 1/2 cups + 1tbsp Sugar
  • 2 Large eggs
  • 4tbsp. Unsalted butter
Caramel (makes 1 1/2 cups)
  • 2/3c. Heavy cream
  • 1/4 Vanilla bean
  • 1 1/4c. Sugar
  • 1/4c. Water
  • 1/4tsp. Salt
  • 2tbsp. Light corn syrup
  • 3/4tsp. Lemon juice
  • 4tbsp. Unsalted Butter
Directions:

For the Flaky Tart Dough: In a small bowl, add the salt to the water and stir to dissolve. Keep very cold until ready to use.

To make the dough in the food processor, put the flour in the work bowl. Cut the butter into 1-inch pieces and scatter the pieces over the flour. Pulse briefly until the mixture forms large crumbs and some of the butter is still in pieces the size of peas. Add the water-and-salt mixture and pulse for several seconds until the dough begins to come together in a ball but is not completely smooth. You should still be able to see some butter chunks.

To make the dough by hand (
I used this method), put the flour in a mixing bowl. Cut the butter into 1-inch pieces and scatter the pieces over the flour. Using a pastry blender or 2 knives, cut the butter into the flour until the mixture forms large crumbs and some of the butter is still in pieces the size of peas. Drizzle in the water-and-salt mixture and stir and toss with a fork until the dough begins to come together in a shaggy mass. Gently mix until the dough comes together into a ball but is not completely smooth. You should still be able to see some butter chunks.

On a lightly floured work surface, divide the dough into 2 equal balls and shape each ball into a disk 1-inch thick (
since I halved the recipe, I only had 1 disk). Wrap well in plastic wrap and chill for at least 2 hours or for up to overnight.

Preheat the oven to 375F

Roll dough out to 1/8-inch thick and place into pie dish. Blind bake the shell for 25mins until the surface looks light brown. Remove the shell from oven and remove the weights, return pie shell to oven and bake until golden brown, about 5 minutes longer.

Let the shell cool completely on a wire rack before filling.

For the Pastry Cream: Have a bowl ready for cooling the pastry cream with a fine-mesh sieve resting on the rim.

Pour the milk into a heavy saucepan. Split the vanilla bean in half lengthwise and use the tip of a sharp knife to scrape the seeds from the pod halves into the milk. Add the salt, place over medium-high heat, and bring to just under a boil, stirring occasionally and making sure that the milk solids are not sticking to the bottom of the pan.

Meanwhile, in a mixing bowl, whisk together the cornstarch and sugar. Add the eggs and whisk until smooth.

When the milk is ready, slowly ladle about one-third of the hot milk into the egg mixture, whisking constantly. Pour the egg-milk mixture back into the hot milk and continue whisking over medium heat until about 2 minutes. I order for the cornstarch to cook ad thicken fully, the mixture must come just to the boiling point. You want to see a few slow bubbles. Remove from heat and immediately pour through the sieve into the bowl. Let cool for 10minutes, stirring occasionally to release the heat and prevent a skim from forming on top.

Cut the butter into 1-tablespoon pieces. When the pastry cream is ready (temp should be at 140F) whisk the butter into the pastry cream 1 tablespoon at a time, always whisking until smooth before adding the next tablespoon.

To cool the cream, cover the bowl with plastic wrap, pressing the wrap directly onto the top of the cream (the plastic wrap prevents a skin from forming on the surface). Chill.

For the Caramel: Pour the cream into a small, heavy saucepan. Split the vanilla bean in half lengthwise and use the tip of a sharp knife to scrape the seeds from the pod halves into the milk. Place over medium-high heart and bring to just under a boil, stirring occasionally. Reduce the heat to low to keep the cream warm (I actually just microwaved the cream for two 25-second intervals once the sugar neared its amber color; saved both stovetop space and the fear of burning the cream).

In a medium, heavy saucepan, combine the sugar, water, salt, and corn syrup. Bring to a boil over medium heat, stirring to dissolve the sugar. Then cook, without stirring, until the mixture is amber colored, 5 to 8 minutes. Remove from heat.

Carefully and slowly add the cream to the sugar syrup. The mixture will boil vigorously at first. Let the mixture simmer down, and then whisk until smooth. Add the lemon juice. Let cool for about 10 minutes.

Cut the butter into 1-inch chunks and add them to the caramel one at a time, whisking constantly after each addition. Then whisk the caramel periodically as it continues to cool.

Final Assembly: Have the pie shell ready for filling. Melt chocolate in a double boiler. Remove from heat. Using a offset spatula, pastry brush, or the back of the spoon, spread the melted chocolate evenly over the bottom of the pie shell. Refrigerate for 10minutes to set the chocolate.

While the chocolate is setting, pour heavy cream into a mixing bowl and whip with a whisk or a mixer fitted with the whisk attachment until thickened. Add the sugar and continue to whip until it holds medium-firm peaks.

Remove the pie shell from the refrigerator and drizzle the caramel evenly over the chocolate. Transfer the pastry cream to the shell. Arrange the banana slices evenly over the pastry cream, and then lightly press them into the cream.

Using an offset or rubber spatula, spread the whipped cream on the top. Cover with chocolate curls and powdered sugar (optional). ENJOY!!!

Chill the pie until the pastry cream is set, at least 3 hours. Serve the pie cool. It will keep in the refrigerator for up to 4 days.

Sunday, June 6, 2010

Not Just For Breakfast or Tea Parties Anymore

Normally when one hears the title "coffee cake", 2 different varieties seem to be implied: the first being that which actually relies on coffee in its flavor and the second being those cakes we see in the glass cases at Starbucks that are intended to be paired with coffee (early in the day, for the most part). Okay, so yes my recipe is of the latter category but I prefer to view a coffee cake in a different light. While it certainly can be enjoyed as a coffee accoutrement, I believe that their versatility and beautiful presentation allows them to stand quite well on their own. For this blog entry, I will discuss the recipe for a Sour Cream Coffee Cake with Walnut Streusel and a Maple Glaze.
When I was asked to co-host a dinner party for a friend's birthday party, I immediately made a game plan to take it over the top. We certainly did, with a menu that included steamed mussels, spicy avocado soup, scalloped potatoes, beef wellington, and more. The dessert, as usual, was placed in my trusting hands. And yet I went with cake that, based on our Starbucks precedents, might seem in no way comparable up against such an elegant repertoire of dishes. Nonetheless, this cake was the star of the show.
A good coffee cake is one that has a diversity of textures. This can easily be achieved by utilizing the methods of previous posts. We know that sour cream is a pro at adding moisture to any cake recipe, and it certainly proved to do so with this cake. This recipe is from my favorite Food Network guru the Barefoot Contessa, and as is her custom she uses a LOT of butter. Don't underestimate butter, though. Dessert is the one field where I refuse to cut back, because any good pastry chef will tell you butter is the holy grail of a good recipe.
Now we have the moist texture, but how to get the crunch. That's where our streusel comes in. Obviously if you omit the walnuts, as the recipe implies, you will lose that crunch, but of course if you are making this for a friend or family member who is allergic, it won't kill the cake to leave out the crunch. It will still have an unbelievable array of flavors that marry beautifully.
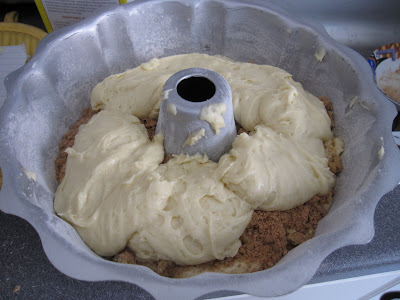
So a confession - this recipe calls for cake flour...I have never used and probably never will use cake flour. There are some recipes online that call for a mixture of flour and cornstarch, etc., but all-purpose works just as well. When measuring, just make sure to se a little less than called for, and NEVER pack the flour. This should be the case with any recipe, even those that call for all-purpose. Packed flour will only result in a dense cake that will sink under its own weight. Lighter, fluffier cakes result from loosely packed and measured flour, trust me :) One other variation on this recipe I made was rather than using a 10-inch tube pan, I used a regular bundt pan. As such, rather than place the streusel in last, I place it in first since that would be the top of the cake when inverted onto a plate.
Sour Cream Coffee Cake with Walnut Streusel and a Maple Glaze
adapted from the Barefoot Contessa
Serves 8 to 10

Ingredients

For Coffee Cake:
  • 12 tablespoons (1 1/2 sticks) unsalted butter at room temperature
  • 1 1/2 cups granulated sugar
  • 3 extra-large eggs at room temperature (I used regular large eggs, little difference)
  • 1 1/2 teaspoons pure vanilla extract
  • 1 1/4 cups sour cream
  • 2 1/2 cups cake flour, not self-rising (I used all-purpose, loosely measured)
  • 2 teaspoons baking powder
  • 1/2 teaspoon baking soda
  • 1/2 teaspoon kosher salt
For Walnut Streusel:
  • 1/4 cup light brown sugar, packed (dark could work too, but it might be a little denser)
  • 1/2 cup all-purpose flour
  • 1 1/2 teaspoons ground cinnamon
  • 1/4 teaspoon kosher salt
  • 3 tablespoons cold unsalted butter, cut into pieces
  • 3/4 cup chopped walnuts, optional (or any type of nut, pecans would be nice!)
For Maple Glaze:
  • 1/2 cup confectioners' sugar
  • 2 tablespoons real maple syrup (no Aunt Jemima folks!)

Directions

Preheat the oven to 350 degrees F. Grease and flour a 10-inch tube pan.

For Cake: Cream the butter and sugar in the bowl of an electric mixer fitted with the paddle attachment for 4 to 5 minutes, until light. Add the eggs 1 at a time, then add the vanilla and sour cream. In a separate bowl, sift together the flour, baking powder, baking soda, and salt. With the mixer on low, add the flour mixture to the batter until just combined. Finish stirring with a spatula to be sure the batter is completely mixed.

For Streusel: Place the brown sugar, flour, cinnamon, salt, and butter in a bowl and pinch together with your fingers until it forms a crumble. Mix in the walnuts, if desired.Spoon half the batter into the pan and spread it out with a knife. Sprinkle with 3/4 cup streusel. Spoon the rest of the batter in the pan, spread it out, and scatter the remaining streusel on top.

Bake for 50 to 60 minutes, until a cake tester comes out clean.Let cool on a wire rack for at least 30 minutes. Carefully transfer the cake, streusel side up, onto a serving plate.

For Glaze: Whisk the confectioners' sugar and maple syrup together, adding a few drops of water if necessary, to make the glaze runny. Drizzle as much as you like over the cake with a fork or spoon.

Tuesday, June 1, 2010

Going Patriotic for Memorial Day

Memorial Day is a day of remembrance and reverence for those who gave their lives to give us our freedom. My own family has been fortunate enough to have not lost anyone in service, but we nonetheless honor those who have fallen. At the same time, the day is a celebration of our freedom. Memorial Day parties have become an inherent part of our culture, and what better way to celebrate then with a cake that pays homage to the Red, the White, and the Blue?

I've moved to a small apartment that I'm subletting for the summer, so this cake was the test-run on using the new kitchen. I'm going to take a small tangent to talk about ovens - for the past 12 months, I was using an electric oven and stove. This apartment I'm subletting has a gas oven and stove. Basically I am in LOVE with gas. The overall efficiency is ten times better than electric. I was always having to worry about the outside of my cakes burning, but not with this new oven!
I was looking for a "summery" cake as the weather has been (as of late) absolutely gorgeous! For Boston, that's quite a feat. Whenever I think of summer desserts, berries is almost always my go-to. I had just bought a whole crate of fresh blueberries and figured that would be perfect. I didn't want to make a pie, and shortcake felt too Betty Crocker for me. When I came across this recipe, I knew that not only was it exactly what I wanted but it was also perfect for Memorial Day.

Based on the photo, you can't tell that melted white chocolate is also incorporated into the dough. And let me tell you, any time a recipe calls for melted chocolate to be added you can 9 times out of 10 bet it will be a winner. This recipe came from a website a frequent quite often called Very Best Baking. It has a collection of recipes sponsored by Nestle, Carnation, and Libby's - three companies whose ingredients any baker should be more than familiar with.

A few suggestions with this cake - use fresh lemon. I used packaged lemon juice, and the taste was tangible in the finished product, but I imagine it would have added an extra kick with the zest. if you plan to use fresh blueberries, toss them in a bowl with about a tablespoon of flour - this will guarantee they don't sink during the baking process. I omitted the lemon extract in the glaze - it just seemed superfluous. This is a great recipe, and you will certainly wow your guests with both the taste and presentation of this cake!


Lemon Blueberry Bundt Cake with White Chocolate Glaze and Strawberries
Adapted from VeryBestBaking.com
Serves 12 - 14

Ingredients

  • 2 cups (12-oz. pkg.) white chocolate chips, divided
  • 2 1/2 cups all-purpose flour
  • 2 teaspoons baking powder
  • 1/2 teaspoon salt
  • 1 1/2 cups granulated sugar
  • 1 cup (2 sticks) unsalted butter, softened
  • 2 teaspoons vanilla extract
  • 3 large eggs
  • 3 tablespoons grated lemon peel (about 4 medium lemons; I used 2 tbsp juice)
  • 1 1/3 cups buttermilk (or 1 1/3 cups whole milk + 1 tbsp vinegar or lemon juice)
  • 1 cup fresh or frozen blueberries
  • 1/4 teaspoon lemon extract (optional; I omitted this)
  • 2 cups fresh whole strawberries (one crate will suffice for decoration)
Directions

  1. Preheat oven to 350° F. Grease and flour 10-cup Bundt pan.


  2. Melt 1 cup morsels in medium, uncovered, microwave-safe bowl on MEDIUM-HIGH (70%) power for 1 minute, checking every 20 seconds to prevent burning. If necessary, microwave at additional 10- to 15-second intervals, stirring just until morsels are melted. Cool slightly.


  3. Sift flour, baking powder and salt in small bowl. Beat sugar, butter and vanilla extract in large mixer bowl until creamy. Beat in eggs one at a time, beating well after each addition. Beat in lemon peel (or lemon juice) and melted morsels. Gradually beat in flour mixture alternately with buttermilk just until combined, beginning and ending with the flour. Pour half of batter into prepared Bundt pan. Toss blueberries with 1 tbsp flour and sprinkle over batter; top with remaining batter and smooth down top.


  4. Bake for 60 to 65 minutes or until wooden pick inserted in cake comes out clean. Cool in pan on wire rack for 30 minutes. Invert onto wire rack to cool completely. Transfer to serving platter.


  5. Melt remaining 1 cup morsels in medium, uncovered, microwave-safe bowl on MEDIUM-HIGH (70%) power for 1 minute; STIR. Morsels may retain some of their original shape. If necessary, microwave at additional 10- to 15-second intervals, stirring just until morsels are melted. Drizzle over cake; allow to set for a few minutes. Place strawberries in center of cake before serving.